How to Build a Sled Kite
Learn how to build a sled kite with these easy-to-follow instructions—fully illustrated with photographs, every step of the way. And there's a video of the kite in flight, near the end.
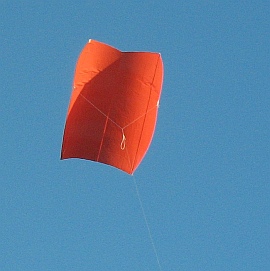
MBK Simple Sled
The steps are easy, hence this simple sled kite comes together very quickly!
You can attach two tails if you want to, just for looks. The kite does just fine without them though, as can be seen in the photo.
We still remember taking out our Simple Sled once in a while, even here inland where the air is a bit rough at times. Talk about convenient—just attach the flying line and up it goes! This design copes well and flies at a good angle on Dacron line.
The best place for flying single-surface sleds, like this one, is down at the beach. The air is quite smooth when it comes from over the ocean.
In any case, put plenty of space between the kite and the nearest upwind obstacles.

On this site, there's more kite-making info than you can poke a stick at :-)
Want to know the most convenient way of using it all?
The Big MBK E-book Bundle is a collection of downloads — printable PDF files which provide step-by-step instructions for many kites large and small.
Every kite in every MBK series.
1. How to Build a Sled Kite
Measuring the Sail
A quick look at the materials and tools for making this kite might be a good idea, first. Then just click the Back button on your browser to get back here.
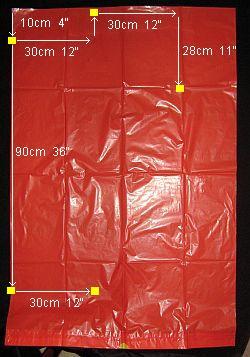
- Place your plastic bag flat on the floor, with the closed end at the top.
- Starting from just below the top-left corner of the bag, measure and mark five dots on the plastic. I've highlighted the dots in yellow, in the photo. Judge the horizontal and vertical directions by eye. If you're careful, there's no need for a T-square.
2. How to Build a Sled Kite
Cutting the Sail
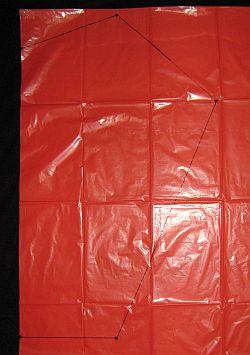
- Take your ruler and connect the dots with the black marker pen, as shown in the photo. (OK, the lines appear a bit faint in the photo!)
- Flip the plastic over and trace over all the black lines.
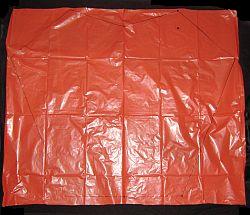
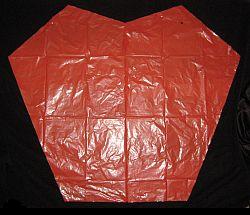
- Cut along the top and right side of the bag, and open it out to show the complete sail outline, as in the first photo above.
- Take your scissors and cut along all the black lines. As in the second photo above, your sled kite sail is nearly complete!
3. How to Build a Sled Kite
Adding the Spars
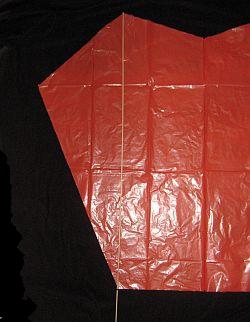
- Lay down a length of your 5 mm (3/16 in.) dowel on the sail, line it up with a top sail-corner and saw it off at the bottom corner. See the first photo, above, where the dowel has not yet been cut.
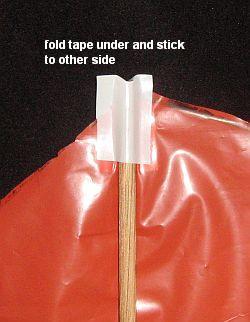
- Cut off a 5 cm (2 in.) length of insulation tape, and stick down the dowel to the plastic. See the second photo.
- Do the bottom end of the dowel the same way and also add tape across the center of the dowel.
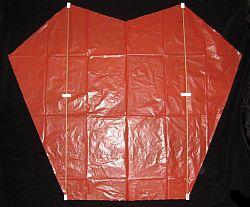
- Do the other dowel the same as the first one, so the kite looks like the third photo.
4. How to Build a Sled Kite
Towing Points
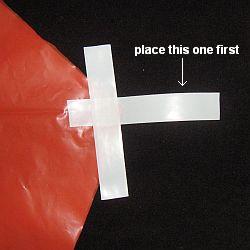
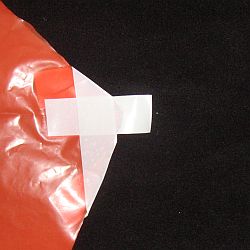
- Snip off two pieces of electrical insulation tape, each 10 cm (4 in.) long.
- Go to the right-most corner of the sail, and lay down the tapes as shown in the first photo above.
- Fold the tapes around onto the underside of the plastic, as shown in the second photo above.
- Press firmly all over to make sure the tapes are fully stuck to the plastic.
- Go to the left side of the kite and do exactly the same thing, using two more strips of tape. All that remains is to add the bridle!
5. How to Build a Sled Kite
Attach the Bridle
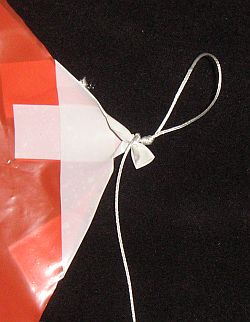
- Cut off a length of flying line that is at least five times longer than the kite is tall.
- Tie one end of the line to the right side towing point of the kite, as in the photo. Use any knot you know but make it as tight as possible, to crush the tape. (I've used a double-wrap slip knot, terminated with a double loop knot ;-) )
- Similarly, tie the other end of the line to the other towing point.
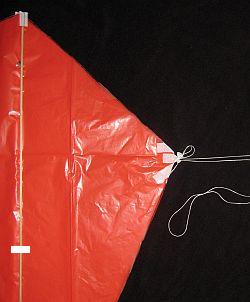
- Nearly finished! Lay the kite on the floor, folded in half so the towing points and spars are one on top of the other. See the photo.
- Stretch out the bridle lines and tie a simple loop in, right near the end. The two bridle lines should be exactly the same length. I've brought the loop knot back into the picture, so you can see it in the photo.
- Your flying line can now be tied to the loop. (An easy-to-remove alternative is to Lark's Head the flying line behind the knot.) That's it, you're ready to fly.
And now—FLYING!
Flight Reports From Other Visitors
Click below to read about various kite-flying adventures, contributed by other visitors to this page.
Fun Sled Kite!
This was a really fun kite to try out! I bought the dowels and trash bags, but without being a careful shopper, the bags were shorter and thinner than …
Moonlight Memories
My son and I built this sled kite this afternoon. We made it a little smaller, at 2/3 scale. We flew it after sunset on a chilly spring evening. We …

As mentioned earlier, there's more kite making on this site than you can poke a stick at :-)
Want to know the most convenient way of using it all?
The Big MBK E-book Bundle is a collection of downloads — printable PDF files which provide step-by-step instructions for many kites large and small.
Every kite in every MBK series.
Back to top of page
© Copyright 2007–2024 by Tim Parish, owner of my-best-kite.com. All rights reserved. Unauthorized copying prohibited.
Images may be pinned with utter abandon!
To read the PRIVACY POLICY of this site, click here.


